
25 October 2016
Structures in the Aru Mountains giant avalanche deposits
Posted by Dave Petley
Structures in the Aru Mountains avalanche deposits
The second enormous Aru Mountains avalanche in Tibet that I featured yesterday have been imaged by an innovative start-up satellite imagery company called Planet, which is launching a constellation of satellites that it is building itself. The quality of the image of the second Aru Mountain avalanche is fantastic, good enough to draw out some very interesting features:-
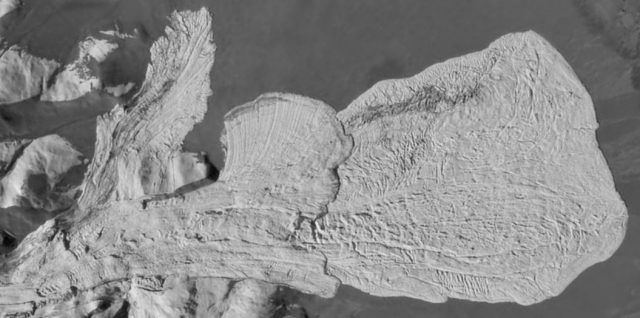
The second Aru Mountains avalanche, imaged by Planet
.
The first key element, that I mentioned yesterday is that it appears to me that this is two separate events, with the deposits lying on top of each other. In the image below I have drawn the boundary between the two. The first event appears to have been larger and to have traveled further:
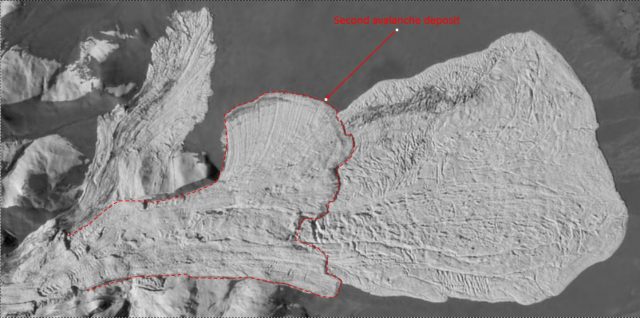
Annotated map of the Aru Mountain avalanche deposit, imaged by Planet
.
The second deposit very clearly lies above the first. The larger, initial, avalanche appears to have had a large lateral offshoot that traveled surprisingly far:
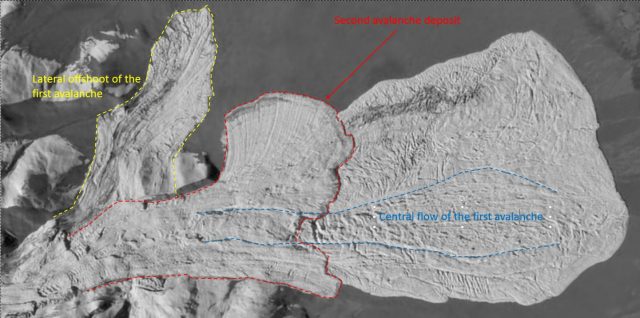
Annotated image of the second Aru Mountains avalanche, imaged by Planet
.
At first glance this looks quite illogical as the Planet image from before the avalanche (below) shows that it has crossed a line of elevated ground. However, this offshoot is almost dead in line with original orientation of the glacier. The implication is that the movement was so rapid that it a portion ploughed straight ahead, over the topography. The second avalanche followed the topography, which suggest to me that it was less energetic. The main deposit from the first avalanche has a very nice central flow structure that I have highlighted above as well; this is even visible beneath the second flow.
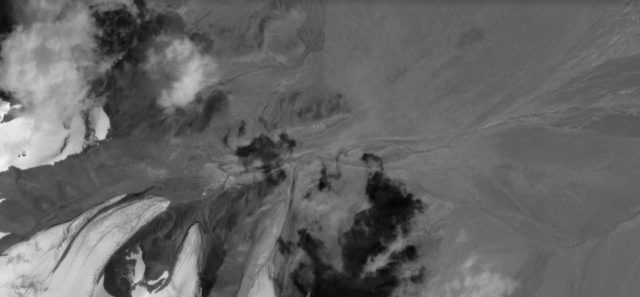
The “before” image of the second Aru Mountains avalanche, imaged by Planet. The glacier that collapsed can be seen bottom left. The avalanche initially flowed over the topography in line with the glacier. The later part of the first collapse, and the second one, followed the topography into the main valley
.
The dynamics of the flow are very complex, but a key factor is the basal friction. The role that this plays is beautifully illustrated by two elements of the second avalanche that I have highlighted below.
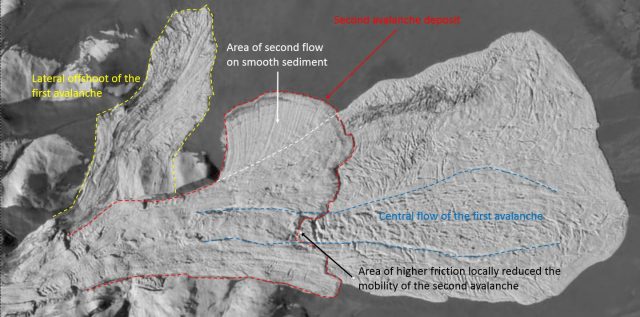
Annotated image of the second Aru Mountains avalanche, as imaged by Planet
.
The initial avalanche event flowed over glacial sediment, whilst the second phase flowed mostly over the deposit from the initial event. Thus the basal dynamics, and friction, were very different. I have annotated in black the portion where the second flow was traveling over the Central Flow structure (in blue). This must have been a rougher surface, with more friction, as the second flow has suffered reduced mobility in this area and has traveled less far, as evidenced by a cut out in the boundary of the flow. and in the north of the image the second flow has spilled over onto fresh sediment (annotated in white). The different basal regime is reflected in a very different deposit, with clear flow lines that are not visible elsewhere.
Thus, the quality of this satellite image allows detailed analysis of this giant avalanche, providing insight into the event. Of course with proper mapping and analysis it would be possible to provide a great deal more understanding.
Other posts that may be of interest
- The mysterious Tibetan ice avalanches of summer 2016
- Lamplugh Glacier rock avalanche: A massive new landslide in Alaska on Tuesday
- Sitka landslide in Alaska – the potential power of simple geomorphic mapping
- Review of a paper: The Donghekou landslide in China
- Oso landslide: differences of opinion about the landslide mechanisms
- Mount La Perouse landslide: a Landsat 8 satellite image
- Jupille 1961: an extraordinary fly ash landslide
- New high resolution images of Kedarnath – the cause of the debris flow disaster is now clear
 Dave Petley is the Vice-Chancellor of the University of Hull in the United Kingdom. His blog provides commentary and analysis of landslide events occurring worldwide, including the landslides themselves, latest research, and conferences and meetings.