
2 December 2011
Teaching the teachers: Activities for a plate tectonics workshop
Posted by Jessica Ball
A few weeks ago, I helped co-teach a plate tectonics workshop with a fellow UB geo grad. The workshop was intended as sort of a continuing education credit for local middle school science teachers, and rather than talk at them the whole time, we decided to have the teachers try out some activities that they could adapt for their classes. Plate tectonics is a pretty broad topic, and we covered everything from the history and development of the idea to volcanic eruptions and earthquakes. (We also took a tour of UB’s earthquake engineering research center, MCEER, which has two shake tables and a whole slew of other nifty gadgets.)
Because we had so much to cover (it was a six-hour workshop), we did three activities – one about sea-floor spreading, one about viscosity (to go along with the volcanology bit where we talk about magma type controlling landform appearance) and one that tied seismology and subduction together. The nice thing about all of these activities is that they’re relatively easy to set up and cheap; purchasing supplies for 15 people to do all three activities (in groups of three or so) cost less than $100, and it’s all stuff that you might have laying around anyway.
“Sea-floor Spreading Made Easy”
This activity can be found on the Geological Society of America’s website, under Education & Outreach. The lesson itself contains a pretty thorough summary of the plate tectonics concepts that lead in to a discussion of sea-floor spreading, but the activity was what got the teachers excited. And it’s really simple – all you need are markers, paper and a couple of desks!
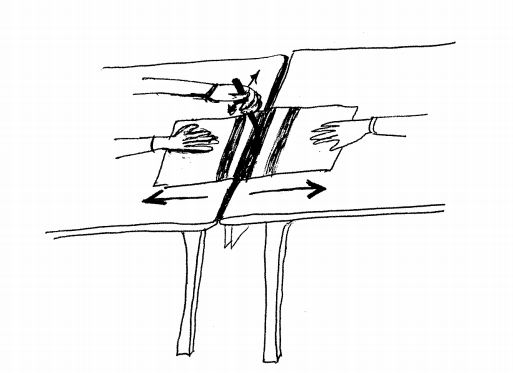
Image taken from the "Sea-floor Spreading Made Easy" activity, GSA.
The idea is to use the paper to represent newly-formed sea-floor at a spreading ridge; you pull the paper up through the crack between two desks and, as you pull, color with the marker to create stripes to represent different magnetic polarities. (The workshop teachers found that it was easier to use a folded piece of paper, as this produces one sheet with mirrored stripes rather than two separate sheets.) The students are then directed to label different aspects of their “spreading ridge”, such as the direction of polarity, the oldest and youngest rocks, and the ridge axis.
The activity suggests having students watch excerpts of the “Planet Earth” TV series produced for PBS in the 1980s. The series is a bit outdated, but the science is just fine and it’s narrated by Richard Kiley, which is always a treat. You can find the whole series in bits on this YouTube page. (Note: This is not the BBC’s recent “Planet Earth” series, which is mainly a nature documentary; this one focuses much more on the history of geology and how geologic knowledge has evolved. I used to watch it when I was little, and it did a lot to get me interested in geology!)
This activity came from Elizabeth Goeke’s Geology teaching resources page. She modified it from an activity hosted on the SERC website, and described the results on her blog. It was an ideal modification, since the original activity is meant for the college level, and the workshop I was teaching was for middle school science. (Thanks, Elli!)
The basic setup is pretty simple: corn syrup is heated, cooled, and mixed with rice to represent different temperatures of lava (or lava with lots of crystals in it, in the case of the rice). Students then create “lava flows” on a tilted surface (such as a cutting board or box top covered in wax paper) and measure how long it takes them to travel a certain distance down the slope. Before this part, they’re asked to make predictions as to which corn syrup will be more or less viscous, and they make observations about how easy or difficult it is for bubbles (blown through a straw) to travel through the “lava”.

Corn syrup can help you explain the viscosity differences between these two lava flows! Left, basalt flows on Kilauea, Hawaii; right, dacite flow at the Santiaguito lava dome complex (from the GVP's Santa Maria photo page).
The activity was messy and took a little prep work to set up (hint: it really helps to have two people and be near a kitchen with a fridge and microwave), but the teachers had fun with it, and seemed to like the visual demonstration of viscosity.
Real evidence of a subducting plate
This is another GSA activity, and a really neat one in terms of tying together the concepts we discussed in the whole workshop. The basic premise is that seismologists can use the epicenters and hypocenters (surface expression and actual location at depth) of earthquakes in a subduction zone to “outline” a subducting tectonic plate. Students are given a map of the west coast of South America, and location/depth/magnitude data of a set of earthquakes. The map is attached to one side of a box (a shoebox or copy paper box would work fine), and the earthquakes are “mapped” in 3D using multicolored styrofoam balls and string, as depicted in the sketch below:
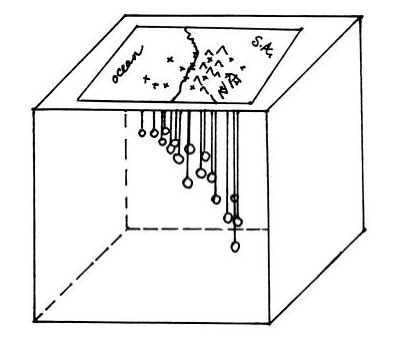
Sketch from the "Real Evidence of a Subducting Plate" activity, GSA.
The depth scale is drawn on the side (the activity suggests a vertical exaggeration of 4x or so, to make the plunging plate more dramatic), and the balls are lowered to the appropriate depth and colored according to earthquake magnitude. (We found that styrofoam is almost too light for this to work properly; we thought that something like washers with colored stickers on them might work better.) This activity is a bit time-consuming, but a few of the teachers thought it would make a good extra-credit or science fair project. I think it’s an awesome way to give students something hands-on and to illustrate how seismologists can suss out what tectonic plates actually look like.
The workshop went well, although my partner and I were pretty tired by the end of it (boy, I have renewed respect for the teachers who do this stuff every day!) Next time I think we’ll do less concept review and more activities, since the teachers all said at the beginning that they wanted to hear about inquiry-based, hands-on lesson plans.
And with that, I’m off to finish preparing for AGU. Hope to see some of you there!
 Jessica Ball is a volcanologist at the U.S. Geological Survey, researching volcanic hydrothermal systems and stability, and doing science communication for the California Volcano Observatory. She previously worked at the Geological Society of America's Washington DC Policy Office, learning about the intersection of Earth science and legislative affairs. Her Mendenhall postdoc and PhD focused on how water affects the stability of volcanoes, and involved both field investigations and numerical modeling applications. Her blogging covers a range of topics, from her experiences in academic geosciences to science outreach and communication to her field and lab work in volcanology.
do you have actual picture of the model . With your permission, can I adopt it to my lesson? thanks.